


and here is the Print Gocco itself.

First of all you need to expose the screen, to do this you need to make a master image. The master image can either be drawn using a carbon pen, or use a photocopy of a drawing or photograph.

You then need to slip a new screen (these can be bought in packs of 5) into the Print Gocco. Place the master image on the print bed and close the lid to make sure it fits in the screen space.

You then need to slip a new screen (these can be bought in packs of 5) into the Print Gocco. Place the master image on the print bed and close the lid to make sure it fits in the screen space.


You then need to get the light box and put in the lamps. It takes two flash lamps and they can only be used once. I have read that these bulbs are toxic, so make sure you wash your hands after handling them. Be sure that the bulbs are screwed in fully, a loose bulb can cause the screen not to fully expose. Also make sure your batteries are not depleting, this has also been a reason for my screens not to expose properly.


When everything is in place fix the light box on top and push down. DON'T look at the flash! It's very very bright. I almost blinded myself when I first exposed a screen! Your drawing will stick to the screen, peel it off slowly.
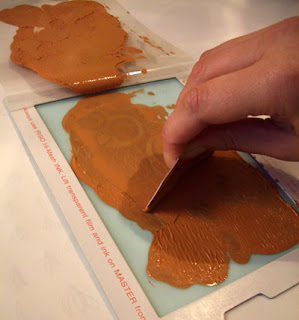
Now you have to ink up the screen. Slip the screen from the gocco lid and peel back the clear film.

Inking up uses a lot of ink, but you have to put enough on to make it go through the screen. I've also found that when you are mixing colours make sure you mix more than you think you need because if you have to stop and mix more paint while in the middle of printing the screen might dry up and it gets frustrating.

So, decide what colour/s you want to use, you can mix colours if you want, (I wanted a light orangey tan for my print so I mixed brown, yellow, white and red).

Then apply the inks to the screen. If you want to use different colours in the same screen you can, but if you don't want them to spread into each other you should use the gocco ink blocking sheet. This is a strip of foam with adhesive on one side, you can cut it into thin strips and stick it to the screen to make sure each colour stays where it is supposed to.

The inked up screen


Now fold down the clear film (it'll want to do this naturally) and slip the screen back into the gocco. Make a test print by putting a scrap piece of paper on the print bed and pushing the lid down (in the same way as you did to expose the screen), you may need to do this a few times to make sure all the ink is getting pushed through properly.
It's a good idea to have all your paper ready to hand and your print racks all set up so you can just print print print!
It's a good idea to have all your paper ready to hand and your print racks all set up so you can just print print print!

If you decide you've done enough of the colour you are using and want to try a different one simply pull out the screen, peel back the film and scrap the excess ink off with a piece of card, do this on the screen and on the film. Then print a few with no ink, just to clear the screen.


Then just spread on your new colour, the old colour will stain the screen and maybe come through a few of your first prints in the new colour, but soon it'll be fine.

When you are finished printing scrap the ink off in the same way as previously described and again print a few with no ink. Then squeeze some screen cleaner on the screen and rub it in with a rag or paper towel until the screen is clean. You should be able to store your clean screens and use them again later. I do find they deteriorate slightly with use, so it's a good idea to keep your master images just in case.
11 comments:
Very interesting Bridget. I have often wondered what this gocco thing was and now I know. I had heard that they were stopping making them but perhaps I misunderstood. They do seem to produce some lovely results.
Really great post Bridget! Good on you for taking the time to write it - it's super helpful.
Thanks for the brilliant post Bridget, great information, and I love the results. May need to add it to my "things to try" list!regards Jo
Good tutorial, cheers!
Excellent! Wonderful description of how to do this process.
That may have been the most interesting and informative little "how to" I've seen in a long time. Thanks. And here I thought the person sat with a etching tool and carved an image. Talk about being totally wrong.
Austin of Sundrip
Thanks for this and the good clear pics. I have a Gocco but I have been bamboolzed by the Japanese instructions and nervous to use it, so I've been looking around online for some easy English language ones. Here they are!
Do you have any tips about using the blue filter? Is it for photographs? Also, do you have any advice about photocopies. How pale should they be?
I live in Japan and use Riso's online store and yes, Riso has discontinued production of all Gocco units (bodies) as of June 30th 2008, BUT you can still get replacement parts (lamp houses, print stages, pads etc. etc.) and supplies (bulbs, pens, inks etc).
I look forward to making Goccos!
That was a great explanation of the process, It looks like fun and your results are beautiful. Nice to meet you the other day, Madeleine
Would you consider giving lessons in Gocco printing. I could come to you. I live in Mornington. I have a press you could use??? Also, would love to meet you. Let me know. Either way I would love to be taught this and would gladly pay for lessons. BillyLee
Thanks for the tutorial. I now have a more clear image of what the gocco print is. The owl is beautiful.
Post a Comment