Well, I've been gocco screen printing again. I sold my last 'Seven Australian Magpies" gocco print last weekend at the Skirt and Shirt Market at the Abbotsford Convent and I decided I needed a new magpie print, so I've made this one based on one of my sketches of this lovely bird! I've listed it on etsy already and I'm framing one up to bring to Rose Street Artists' Market next week.
NEW BLOG
I have now finished this blog, if you'd like to continue to follow me please go to my new blog www.bridgetfarmer.blogspot.com.
Showing posts with label screenprint. Show all posts
Monday, April 20, 2009
New Maggie
My computer is still out, that's why I've not been blogging lately, but I've managed to get a photo onto my cousin's computer. My attention is being sidetracked by "Herbie Rides Again" that my cousin's three year old son has playing in the background, so excuse any mistakes!
Labels:
australian magpie,
gocco,
magpie,
screenprint
Tuesday, February 24, 2009
On a Roll
I'm doing well with the old blog this week eh!? I think today it's because I'm aiming to go for a walk/run and I'm procrastinating.
Anyway I thought I'd post up a few of the Fantail gocco prints in the other colour combinations. As soon as I manage to get to the art shop to buy mount board and somehow get A1 sheets of it back on my bike I will be selling these new goccos at Rose Street Artists' Market. Until then, I've added them to my etsy shop.


I also want to make cards out of them, but that's another logistical issue with the large sheets of card and only a bike!
Remember to check out the Oz Bush Fire Appeal etsy shop, it is still open until 31st March and there are lots of goodies to be had. It's all for a good cause!
Right I'm off to see if my Frogmouth is home.
Friday, October 24, 2008
Melbourne Houses
After waking up this morning having dreamt that I'd slept in and missed my exhibition, which is opening tomorrow, I decided I needed to make the most of the day.
So, I found a new outlet that sells good paper bags, I finished mounting my screenprints and I managed to make a new gocco print. All in time for Rose Street Artists' Market tomorrow.
My new gocco print is a two screen print of Melbourne Houses. I went drawing yesterday with a friend and we ended up sitting at the side of the road in the sun and dust drawing the gorgeous Victorian houses that are typical of Melbourne. I want to do a series of Melbourne Houses, I'll have this one with me tomorrow at Rose Street.

We were also drawing in the cemetery yesterday. This is a continuous line left handed drawing. I like drawing with my left hand, even though I'm right handed, I find it loosens me up and I look more carefully at the subject.
Now Jeremy and I are going out for dinner. My lovely brother and sister-in-law booked my favourite restaurant (Wabi-Sabi) from Belfast and even gave us dollars for our evening! Yum yum yum!
So, I found a new outlet that sells good paper bags, I finished mounting my screenprints and I managed to make a new gocco print. All in time for Rose Street Artists' Market tomorrow.
My new gocco print is a two screen print of Melbourne Houses. I went drawing yesterday with a friend and we ended up sitting at the side of the road in the sun and dust drawing the gorgeous Victorian houses that are typical of Melbourne. I want to do a series of Melbourne Houses, I'll have this one with me tomorrow at Rose Street.
We were also drawing in the cemetery yesterday. This is a continuous line left handed drawing. I like drawing with my left hand, even though I'm right handed, I find it loosens me up and I look more carefully at the subject.
Now Jeremy and I are going out for dinner. My lovely brother and sister-in-law booked my favourite restaurant (Wabi-Sabi) from Belfast and even gave us dollars for our evening! Yum yum yum!
Labels:
drawing,
gocco,
melbourne houses,
screenprint
Tuesday, July 29, 2008
Oh the Beards! the Beards!
I thought I'd share with you my newest etsy purchase. It is a screenprinted artist book by Linocutboy (Nick Morley) entitled 'Beard Book.' It was produced to accompany the exhibition "Nick Morley's Amazing World of Beards" that took place at the Permanent Gallery in Brighton, England.
I've always loved beards. My dad died when I was very young but I remember he had a huge 70's beard, and apparently when I was little I'd just go and sit on bearded men's knees. I don't do this anymore, but I do still have a bit of a fascination with facial hair. So when I saw this book on etsy I decided I had to have it.


I've always loved beards. My dad died when I was very young but I remember he had a huge 70's beard, and apparently when I was little I'd just go and sit on bearded men's knees. I don't do this anymore, but I do still have a bit of a fascination with facial hair. So when I saw this book on etsy I decided I had to have it.


So, check out Nick Morley's etsy shop for his other works and support beard loving artists!
and yes, my Jeremy has a beard, a nice big orange one!
Friday, June 13, 2008
What is a Gocco Print?
A Gocco print is a screenprinted image created using the Japanese Print Gocco kit (also called Riso). Here are some examples of Gocco prints below.
(Left to Right, AnnaRubyKing "Nesting Material", Junecraft "Retro Cooking", PrettyLittleThieves "Can We Be Friends on Page 11")
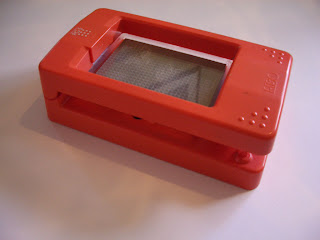
and here is the Print Gocco itself.


You then need to get the light box and put in the lamps. It takes two flash lamps and they can only be used once. I have read that these bulbs are toxic, so make sure you wash your hands after handling them. Be sure that the bulbs are screwed in fully, a loose bulb can cause the screen not to fully expose. Also make sure your batteries are not depleting, this has also been a reason for my screens not to expose properly.
Your image should now be exposed onto the screen. Take off the light box.
Now you have to ink up the screen. Slip the screen from the gocco lid and peel back the clear film.
Inking up uses a lot of ink, but you have to put enough on to make it go through the screen. I've also found that when you are mixing colours make sure you mix more than you think you need because if you have to stop and mix more paint while in the middle of printing the screen might dry up and it gets frustrating.
So, decide what colour/s you want to use, you can mix colours if you want, (I wanted a light orangey tan for my print so I mixed brown, yellow, white and red).


The inked up screen


Then just spread on your new colour, the old colour will stain the screen and maybe come through a few of your first prints in the new colour, but soon it'll be fine.

I buy all my materials from an Australian based company called nehoc, although I bought my starter kit from a seller on eBay and there are sellers on etsy too. Do shop around for your starter kit as prices do vary.
(Left to Right, AnnaRubyKing "Nesting Material", Junecraft "Retro Cooking", PrettyLittleThieves "Can We Be Friends on Page 11")
and here is the Print Gocco itself.

First of all you need to expose the screen, to do this you need to make a master image. The master image can either be drawn using a carbon pen, or use a photocopy of a drawing or photograph.
You then need to slip a new screen (these can be bought in packs of 5) into the Print Gocco. Place the master image on the print bed and close the lid to make sure it fits in the screen space.
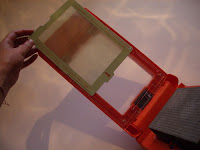


You then need to get the light box and put in the lamps. It takes two flash lamps and they can only be used once. I have read that these bulbs are toxic, so make sure you wash your hands after handling them. Be sure that the bulbs are screwed in fully, a loose bulb can cause the screen not to fully expose. Also make sure your batteries are not depleting, this has also been a reason for my screens not to expose properly.
Your image should now be exposed onto the screen. Take off the light box.
Now you have to ink up the screen. Slip the screen from the gocco lid and peel back the clear film.
Inking up uses a lot of ink, but you have to put enough on to make it go through the screen. I've also found that when you are mixing colours make sure you mix more than you think you need because if you have to stop and mix more paint while in the middle of printing the screen might dry up and it gets frustrating.
So, decide what colour/s you want to use, you can mix colours if you want, (I wanted a light orangey tan for my print so I mixed brown, yellow, white and red).
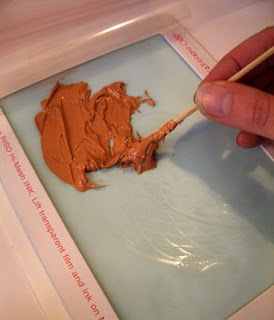
Then apply the inks to the screen. If you want to use different colours in the same screen you can, but if you don't want them to spread into each other you should use the gocco ink blocking sheet. This is a strip of foam with adhesive on one side, you can cut it into thin strips and stick it to the screen to make sure each colour stays where it is supposed to.
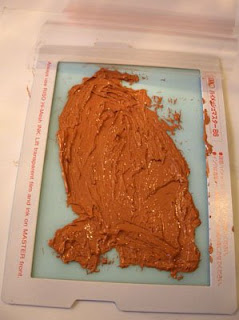
The inked up screen
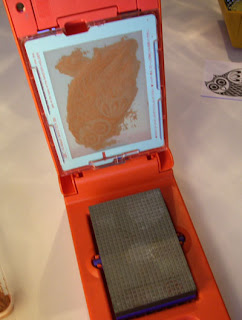
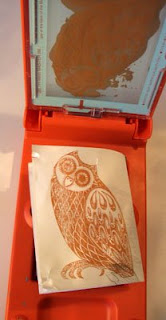
Now fold down the clear film (it'll want to do this naturally) and slip the screen back into the gocco. Make a test print by putting a scrap piece of paper on the print bed and pushing the lid down (in the same way as you did to expose the screen), you may need to do this a few times to make sure all the ink is getting pushed through properly.
It's a good idea to have all your paper ready to hand and your print racks all set up so you can just print print print!
If you decide you've done enough of the colour you are using and want to try a different one simply pull out the screen, peel back the film and scrap the excess ink off with a piece of card, do this on the screen and on the film. Then print a few with no ink, just to clear the screen.
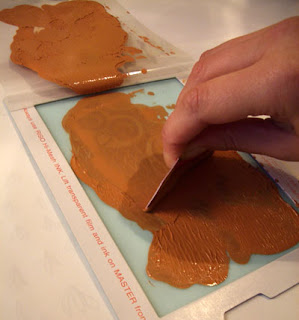


Then just spread on your new colour, the old colour will stain the screen and maybe come through a few of your first prints in the new colour, but soon it'll be fine.
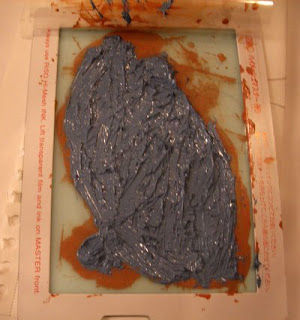
When you are finished printing scrap the ink off in the same way as previously described and again print a few with no ink. Then squeeze some screen cleaner on the screen and rub it in with a rag or paper towel until the screen is clean. You should be able to store your clean screens and use them again later. I do find they deteriorate slightly with use, so it's a good idea to keep your master images just in case.
Labels:
gocco,
how to,
riso,
screenprint,
what is gocco
Monday, June 9, 2008
New Goccos
I have started working in a little gallery, aptly named 'bird's gallery.' It's a really lovely place to be and while I was there last week, listening to nice music and stroking the gallery cat, I started to draw a few little doodles which today I made into new gocco screenprints.


I experimented with different colour combinations and different papers. I will soon start listing them on my various online shops. But now, after making a mess of the living room that I tidied just this morning, I have to go and do the dishes and bring our wet laundry to the laundrette like I said I would 5 hours ago.
I've just found out I've been included in Mindless Pursuit's blog, have a look and see other etsyer interviews.
Sunday, April 6, 2008
I'm a little husky!
No, not the dog. My voice. It's on its way out. Well, I don't need it for on here so I'm alright!
I've been busy sewing at Thread Den making new brooches. (I don't have a sewing machine at home yet.) Here are a few, I've listed this lot on Dawanda.


I've also had some of my screen printed birds made into button brooches, I'm pleased with the result. As soon as my new gocco supplies arrive I will make more in other colours.

I'm also very very happy to say that the Australian Print Workshop, where I do all my etching, has given me a scholarship for this year! This means I am free to use the facilities and I will have an exhibition at the end of the year along with the other two scholarship printmakers. I'm very excited and I have new ideas running through my head for new projects and things to try. Keep watching!
Thursday, March 27, 2008
Print Goccoing
This is a Print Gocco, it looks like a toy, but it enables you to make intricate screen prints easily.
You slip in a screen and then place your image that you want to expose on the print bed. This image needs to be drawn either with a special print gocco carbon pen, or it needs to be a photocopy. I've only made prints from carbon pen drawings.
You then need to get the light box and put in the lamps. It takes two flash lamps and they can only be used once. I buy packs of 10 but they still don't last me all that long.
Then fix the light box on top and push down. DON'T look at the flash! It's very very bright. I almost blinded myself when I first exposed a screen! Your drawing will stick to the screen, peel it off slowly.
Your image should now be exposed onto the screen. Take off the light box. Now you have to ink up the screen. This uses a lot of ink, but you have to put enough on it to make it go through the screen. I've also found that when you are mixing colours make sure you mix more than you think you need because if you have to stop and mix more paint while in the middle of printing the screen dries and it gets frustrating.
Pull out the screen, peel back the film, and thickly apply the paint. (sorry I have no photos of this at present)
Now slip the screen back into the gocco, place a trial piece of paper on to the bed, close the top and push down. Your image should be printed! Now continue with the paper of your choice. I normally get about 75 prints, although I do have to top up the ink every now and then.
This post has got rather long, I think I shall continue it another day. There is other work I should be doing! and I wouldn't want you to get bored.
To be continued...!
Tuesday, March 25, 2008
After the Calm of Easter
I came back from Jeremy's parents' house yesterday and got stuck into making making making. I felt a bit starved of it over the holiday weekend. I'm not very good at just relaxing. I had been all prepared and brought a bag of felt to make brooches, but managed to leave it at someones house on our way to Geelong. (rather typical of me)
So, I got back into the swing of things yesterday afternoon and tried screen printing onto some bags I had bought ages ago. I remembered how at art college we had just used newsprint paper to make the stencils, so I tried that and it seemed to work quite well.

I also finished off my owl brooch that I had started while at Rose Street Artist's Market.

Now I really have to make more gocco prints for my mum's cookbook. Maybe if I say I will show at least two in my next post that will give me a shove!
Labels:
bag,
birds,
bridbird,
bridget farmer,
brooch,
felt,
owl,
screenprint
Wednesday, February 13, 2008
Where is it, I'm sure I saw it just the other day?
I'm on a search for black thread, I'm sure I have some somewhere. It's one of those things you're sure you saw on the bookshelf, no, on top of the fridge, no, it was definitely on the floor in a corner by the chest of drawers. But it's not in any of these places! I'm very frustrated, I'm sure I have about six reels of black thread but can never find them so I go and buy yet another one. I'm making a little felt car for Jeremy for valentines and it's missing the wheels on the right hand side. I started making it at work where there is a plentiful supply of black thread, but now alas I am having a black thread drought.
Anyway, to take my mind off the futile search I will show you my new Gocco print.

Right then, I've found some black bookbinding thread, which is rather thick, but it'll have to do. Back to sewing...
Anyway, to take my mind off the futile search I will show you my new Gocco print.

Right then, I've found some black bookbinding thread, which is rather thick, but it'll have to do. Back to sewing...
Labels:
gocco,
lost,
pears,
pearshaped,
screenprint,
search
Monday, January 21, 2008
My new toy

After wondering what a gocco print was from seeing so many mentioned on www.etsy.com I started researching into this medium. It is basically a simple home screen printing set invented by a japanese man about 25 years ago. This was before households had computers and he believed everyone should have the means to print their own invitations and cards. I became fascinated by this machine, and wooed by the beautiful images other artists had created using print gocco. So I bought myself one on ebay, found the instructions in english on the internet (the ones supplied were in japanese!) and last week I made my first print. I'm now hooked.
Seven Australian Magpies
This is my first gocco print.
Three Female Satin Bowerbirds
This is my second gocco print.
Now I need to buy more paper so I can make more more more!
Subscribe to:
Posts (Atom)


