Finally my gocco supplies arrived and I got straight to work. I did this owl screenprint in 3 different colours. The screen didn't expose perfectly, not quite sure why, maybe too much dark areas...I'm actually being distracted as I write this by Ewan McGregor, sadly not in real life, but on dvd motorbiking through Africa, it's hard to concentrate. I'll just show the pictures.
NEW BLOG
I have now finished this blog, if you'd like to continue to follow me please go to my new blog www.bridgetfarmer.blogspot.com.
Thursday, June 26, 2008
Wednesday, June 25, 2008
New Birds
Another trip to the museum this week. This time I borrowed Anna's watercolour paint and tried a few Currawongs with a paintbrush. I like the result. There is a printmaking techique called sugarlift which results in a more painterly quality of line on the plate, I wonder if I could use these images in that way. More things to try out!


Labels:
bird,
black swan,
bridget farmer,
currawong,
drawing,
painting
Monday, June 23, 2008
It's Been a While!
Sorry for neglecting the old blog last week, I got a bit snotty and I've been waiting for gocco supplies to arrive before I can make new prints. Supplies STILL haven't arrived, but the snot situation has cleared up so I thought I'd show you a few of my new brooches.
 I had made felt brooches before, but I sort of stopped. Then I found feltcraftstudio on etsy who sold wool felt. I couldn't resit it. I bought 12 colours and started making them again. OH! the difference between working in the synthetic felt and the wool felt. Wool felt is just gorgeous to work with! To make these brooches I layer up the colours and cut into them to reveal the colour underneath. Then I hand sew them together adding details along the way.

I'm only selling these brooches at Rose Street Artists Market, so far they seem to go rather well there. Each brooch is individual, often they sort of create themselves, I just weild the scissors and the needle and thread and they guide me, coming in to existance with their own character and expression! Christina, who has a stall beside me (she sells brilliant skirts that you can wear in numerous ways) said I should try and put my maker name onto my brooches, so I've started to hand stitch 'bridbird' onto the back. I think it's a nice touch. Now I need to restock for next Saturday.
 I had made felt brooches before, but I sort of stopped. Then I found feltcraftstudio on etsy who sold wool felt. I couldn't resit it. I bought 12 colours and started making them again. OH! the difference between working in the synthetic felt and the wool felt. Wool felt is just gorgeous to work with! To make these brooches I layer up the colours and cut into them to reveal the colour underneath. Then I hand sew them together adding details along the way.
I'm only selling these brooches at Rose Street Artists Market, so far they seem to go rather well there. Each brooch is individual, often they sort of create themselves, I just weild the scissors and the needle and thread and they guide me, coming in to existance with their own character and expression!
 Christina, who has a stall beside me (she sells brilliant skirts that you can wear in numerous ways) said I should try and put my maker name onto my brooches, so I've started to hand stitch 'bridbird' onto the back. I think it's a nice touch. Now I need to restock for next Saturday.
Friday, June 13, 2008
What is a Gocco Print?
A Gocco print is a screenprinted image created using the Japanese Print Gocco kit (also called Riso). Here are some examples of Gocco prints below.
(Left to Right, AnnaRubyKing "Nesting Material", Junecraft "Retro Cooking", PrettyLittleThieves "Can We Be Friends on Page 11")
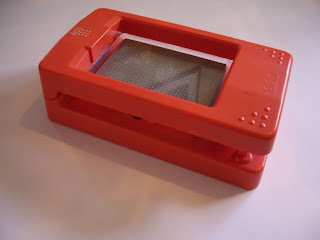
and here is the Print Gocco itself.
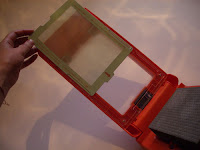

You then need to get the light box and put in the lamps. It takes two flash lamps and they can only be used once. I have read that these bulbs are toxic, so make sure you wash your hands after handling them. Be sure that the bulbs are screwed in fully, a loose bulb can cause the screen not to fully expose. Also make sure your batteries are not depleting, this has also been a reason for my screens not to expose properly.
Your image should now be exposed onto the screen. Take off the light box.
Now you have to ink up the screen. Slip the screen from the gocco lid and peel back the clear film.
Inking up uses a lot of ink, but you have to put enough on to make it go through the screen. I've also found that when you are mixing colours make sure you mix more than you think you need because if you have to stop and mix more paint while in the middle of printing the screen might dry up and it gets frustrating.
So, decide what colour/s you want to use, you can mix colours if you want, (I wanted a light orangey tan for my print so I mixed brown, yellow, white and red).
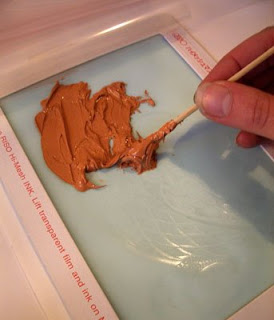
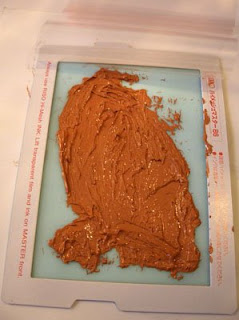
The inked up screen
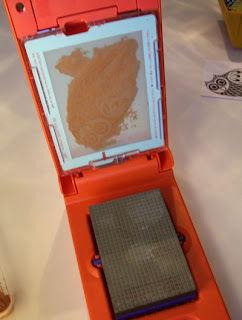
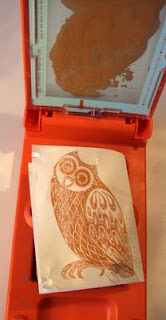
Then just spread on your new colour, the old colour will stain the screen and maybe come through a few of your first prints in the new colour, but soon it'll be fine.
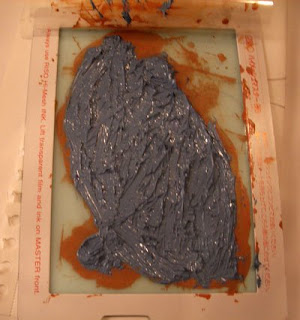
I buy all my materials from an Australian based company called nehoc, although I bought my starter kit from a seller on eBay and there are sellers on etsy too. Do shop around for your starter kit as prices do vary.
(Left to Right, AnnaRubyKing "Nesting Material", Junecraft "Retro Cooking", PrettyLittleThieves "Can We Be Friends on Page 11")
and here is the Print Gocco itself.

First of all you need to expose the screen, to do this you need to make a master image. The master image can either be drawn using a carbon pen, or use a photocopy of a drawing or photograph.
You then need to slip a new screen (these can be bought in packs of 5) into the Print Gocco. Place the master image on the print bed and close the lid to make sure it fits in the screen space.
You then need to slip a new screen (these can be bought in packs of 5) into the Print Gocco. Place the master image on the print bed and close the lid to make sure it fits in the screen space.


You then need to get the light box and put in the lamps. It takes two flash lamps and they can only be used once. I have read that these bulbs are toxic, so make sure you wash your hands after handling them. Be sure that the bulbs are screwed in fully, a loose bulb can cause the screen not to fully expose. Also make sure your batteries are not depleting, this has also been a reason for my screens not to expose properly.
Your image should now be exposed onto the screen. Take off the light box.
Now you have to ink up the screen. Slip the screen from the gocco lid and peel back the clear film.
Inking up uses a lot of ink, but you have to put enough on to make it go through the screen. I've also found that when you are mixing colours make sure you mix more than you think you need because if you have to stop and mix more paint while in the middle of printing the screen might dry up and it gets frustrating.
So, decide what colour/s you want to use, you can mix colours if you want, (I wanted a light orangey tan for my print so I mixed brown, yellow, white and red).

Then apply the inks to the screen. If you want to use different colours in the same screen you can, but if you don't want them to spread into each other you should use the gocco ink blocking sheet. This is a strip of foam with adhesive on one side, you can cut it into thin strips and stick it to the screen to make sure each colour stays where it is supposed to.

The inked up screen


Now fold down the clear film (it'll want to do this naturally) and slip the screen back into the gocco. Make a test print by putting a scrap piece of paper on the print bed and pushing the lid down (in the same way as you did to expose the screen), you may need to do this a few times to make sure all the ink is getting pushed through properly.
It's a good idea to have all your paper ready to hand and your print racks all set up so you can just print print print!
It's a good idea to have all your paper ready to hand and your print racks all set up so you can just print print print!
If you decide you've done enough of the colour you are using and want to try a different one simply pull out the screen, peel back the film and scrap the excess ink off with a piece of card, do this on the screen and on the film. Then print a few with no ink, just to clear the screen.
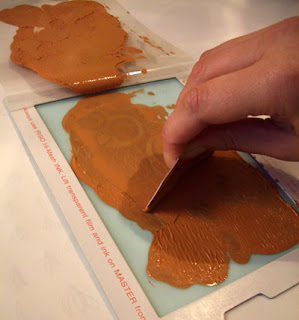


Then just spread on your new colour, the old colour will stain the screen and maybe come through a few of your first prints in the new colour, but soon it'll be fine.

When you are finished printing scrap the ink off in the same way as previously described and again print a few with no ink. Then squeeze some screen cleaner on the screen and rub it in with a rag or paper towel until the screen is clean. You should be able to store your clean screens and use them again later. I do find they deteriorate slightly with use, so it's a good idea to keep your master images just in case.
Labels:
gocco,
how to,
riso,
screenprint,
what is gocco
Thursday, June 12, 2008
The Latest from the Museum
On Tuesday Anna and I went along to the museum again for our bird drawing session. We only had two birds this week, a Bellbird and a Curlew. The Curlew was a winner with his long long beak, but it was difficult getting him to fit on the page! His feathers were gorgeous and it was great to be able to study the varying patterns on his feathers. Since I use these drawings to make etchings I have to remember to take note of the detail (something I'm often a bit lazy about) because the drawings are all I have when it comes time to make the etching plate.
Bellbirds are the bird you hear down by the river in Melbourne. By Merri Creek and along the Yarra. They make a short loud sharp 'pip' sound, a bit like a fire alarm battery running out. They 'pip' to each other and you can hear them 'pipping' in the trees all along the banks of the river, but often you can't see them, if you do get a glimpse of one it's a surprise to see how green they are, or maybe it's just a surprise to me because I'm still not used to seeing brightly coloured birds!
Bellbirds are the bird you hear down by the river in Melbourne. By Merri Creek and along the Yarra. They make a short loud sharp 'pip' sound, a bit like a fire alarm battery running out. They 'pip' to each other and you can hear them 'pipping' in the trees all along the banks of the river, but often you can't see them, if you do get a glimpse of one it's a surprise to see how green they are, or maybe it's just a surprise to me because I'm still not used to seeing brightly coloured birds!
Monday, June 9, 2008
New Goccos
I have started working in a little gallery, aptly named 'bird's gallery.' It's a really lovely place to be and while I was there last week, listening to nice music and stroking the gallery cat, I started to draw a few little doodles which today I made into new gocco screenprints.


I experimented with different colour combinations and different papers. I will soon start listing them on my various online shops. But now, after making a mess of the living room that I tidied just this morning, I have to go and do the dishes and bring our wet laundry to the laundrette like I said I would 5 hours ago.
I've just found out I've been included in Mindless Pursuit's blog, have a look and see other etsyer interviews.
Sunday, June 8, 2008
Funiscool is Cool!
I have become a fan of Sarah McNeils little bird brooches. I bought a shining flycatcher brooch and it's just gorgeous! Have a look at these other delights all carefully cut out of coloured card.


You can see more of her work in her etsy shop funiscool or on her blog. Or if you are in Melbourne I recently discovered a new made in melbourne shop on Victoria Street which sells Sarah's work. It is called Bamakko and has many melbourne made items, now including my own!


You can see more of her work in her etsy shop funiscool or on her blog. Or if you are in Melbourne I recently discovered a new made in melbourne shop on Victoria Street which sells Sarah's work. It is called Bamakko and has many melbourne made items, now including my own!
Labels:
bamakko,
bird,
brooches,
card,
delightful,
funiscool,
lovely,
made in melbourne,
paper
Thursday, June 5, 2008
A call for more MADEIT sellers! and buyers!!

http://www.madeit.com.au/ is an Australian independent designer/ maker Internet site. A bit like etsy except all Australian. I have been making a few sales through madeit and the site looks really good. It has a great blog and promotes itself really well. I just think it needs more items. So! if you are already on etsy or dawanda or even if you haven't tried selling on the internet yet, give madeit a go. The more people on there the bigger it will become.
and while you're at it, anything on there that you'd like to buy?!
Labels:
australia,
designer,
etsy,
independent,
madeit
Tuesday, June 3, 2008
A Stroll Down South Bank
Last week I needed to draw the ferris wheel situated behind Federation Square on the banks of the River Yarra. It was a lovely day and I sat by the bank of the river and drew, not only the ferris wheel, but lots of other things that caught my fancy! Here is a view upriver to the city.


Labels:
bridget farmer,
drawing,
melbourne,
river yarra,
sketch,
south bank
Monday, June 2, 2008
What a Busy Week!
Sorry for not blogging in so long, last week was just so busy! I was hardly home in the evening, which is very unusual for me. On Thursday night I took a train to Armadale to see Joel Casemore's printmaking exhibition at the Firestation Print Studio. It was very good and I recommend if you are in Armadale / Malvern you should check it out.

Joel Casemore, exercise #38

Joel Casemore, exercise #38
I was also included in an etsy treasury last week. The treasury is made up of a variety of etsy makers' work and the treasury designer (lorenzstudio) has chosen great summery colours to cheer me up as we go into winter here in australia! She has a lovely blog too.
I'll try not to leave it so long next time!
I'll try not to leave it so long next time!
Subscribe to:
Posts (Atom)


